Make and Takes Daily Fix |
| Cute Twist on a Simple Paper Garland Posted: 29 Jun 2010 03:10 PM PDT How simple is this Paper Garland from ISLY? Melissa shares how to loopy-loo strips of paper into a new and fun decoration. Share and Bookmark:       |
| Sew This Fun DIY Fat Quarter Bag Posted: 29 Jun 2010 02:37 AM PDT Guest Post by Amy of Diary of a Quilter: This project is a really quick and easy one creating the perfect little girl-bag. (Or maybe even a grown-up girl bag.) The possibilities are endless. I'll demo the basic assembly technique and then a couple of embellishing options and you can let your creativity go from there!
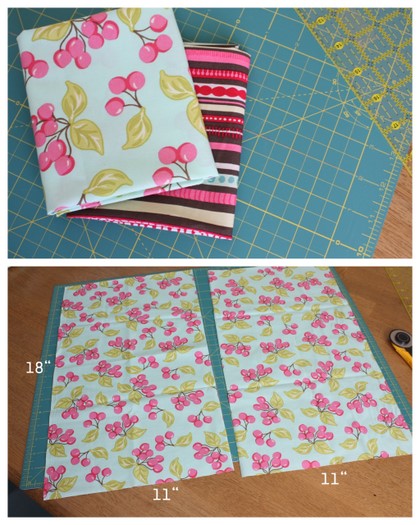
To start all you'll need is a Fat Quarter piece of fabric. If you want your bag to have a contrasting lining, get a second fat quarter and you'll have enough for two cute bags! First of all, what is a Fat Quarter? Craft stores and fabric stores often carry pre-cut pieces of yardage called Fat Quarters. They are pieces of fabric measuring 18" x 22". I chose to use two different FQ's and make two bags.
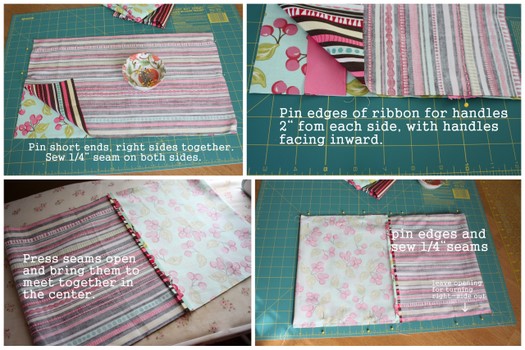
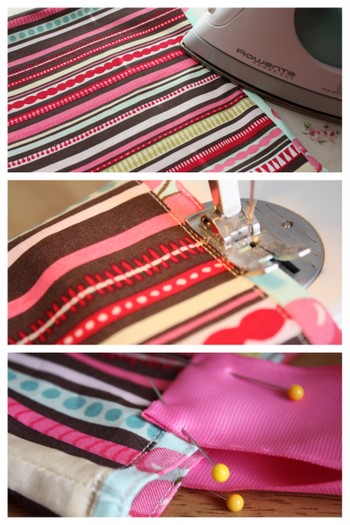
Begin by cutting your FQ's in half creating 2 pieces 11" x 18", shown above. Cut 2 16" pieces of ribbon for the handles. (I used 1 ½" wide grosgrain.) Match-up your outer fabric and your lining fabric right sides together and pin at the two 11"ends. Pin the ribbon for the handles between the two pieces of fabric, 2" from the outside edges. Sew ¼" seam. Now take it to your ironing board. Bring the two seams to the center and match them up. Press seams open. You will now have your lining-piece folded in half on one side of the seam and your outside piece folded in half on the other.
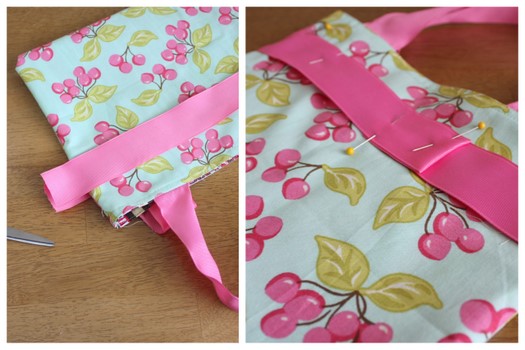
Match up the two seams and pin in place. Pin open sides together, leaving a 3″ opening on one side of the lining fabric for turning right side out. Sew ¼" seams on both sides. Turn bag right-side out and top-stitch opening closed. It will look like a flat, empty pillow. Tuck lining fabric inside the outside bag fabric. Now it’s starting to look like an actual bag! Press the top edge of the bag and top stitch around the edge of the bag. I also topstitch again 1/4" from the top. (This will help secure the handles a little as well.) This is easy, and it will give the bag a nice, finished edge. For a decorative ribbon trim, cut the ribbon length you need (about 23").
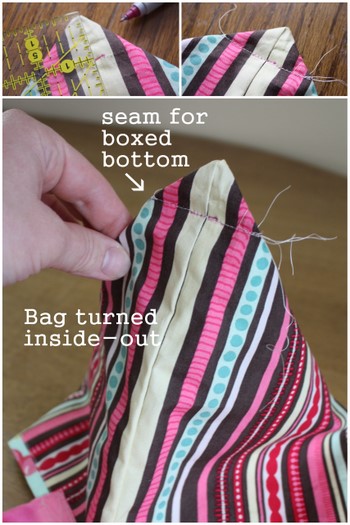
Pin the ribbon in place, folding the end of the ribbon underneath itself. Top-stitch ribbon edges to the bag. To make the bag have a squared-off bottom edge, turn the bag inside out, tucking the bottom corners inside each other. Flatten the side seam lined up parallel with the bottom crease, creating a pointed/triangle.
Measure 1" down from the top of the point/triangle and make a mark. Then draw a line at that point, perpendicular to the seam. Sew a straight line right on top of the line that you marked, back-stitching at the beginning and end. Clip threads. Repeat with other bottom corner. This will give you two little, flappy triangles in each corner. Pull the bag right-sides out and you have a nice little boxed bottom. You can tack-down the little triangles inside if you want. (Depends who I'm giving the bag to – if it's a 5-year-old, I won't take the time to tailor the inside of the bag!) Voila. A finished bag! To make the second Fat Quarter Bag: I sewed the 11" edges right sides together without putting the ribbon handles in. Repeat bag process. (Bring seams to the center, press, seams open, sew open ends, leaving 3" opening for turning bag right side out, sew ¼" seams, pull right-side out, top-stitch opening, tuck lining inside, press top of bag.) To make a band of trim around the top of the bag, roll the lining fabric above the bag about 1/4″. Pin to hold fabrics in place and press. Top stitch around the edge of the bag at the top of the outer fabric AND at the top of the lining fabric. This is easy, and gives the bag a nice, decorative edge.
This time, sew the ribbon handles to the top of the bag itself using two 15" pieces of ribbon. Once again, you could leave the bag as it is now or add the tucks at the bottom. (It's slightly trickier to box the bottom edge of the bag since the lining is shorter because you've used it as a decorative edge, but the process still works.) The possibilities for embellishing the bag are endless: Trims, button closures, fabric handles instead of ribbon . . . Use your creativity. And there you go – two really easy little bags – for the price of 2 Fat Quarters (about $2.50 each) and about 2 ½" yards of grosgrain ribbon. Thanks again to Marie for letting me hang out at Make & Takes today!
       Related Posts: |
| You are subscribed to email updates from Make and Takes To stop receiving these emails, you may unsubscribe now. | Email delivery powered by Google |
| Google Inc., 20 West Kinzie, Chicago IL USA 60610 | |


 Amy Smart is a wife to a busy, smart husband and a mother to 4 busy, mostly-happy kids. During her spare time she likes to sew – especially to make quilts – and to blog about it at